¶ When an error message appears on the pad, log in to the web first to view the specific error message.
¶ Reference video:
https://www.youtube.com/watch?v=PCnd1bj5PcM
¶ 1. Unable to connect
¶ Phenomenon:
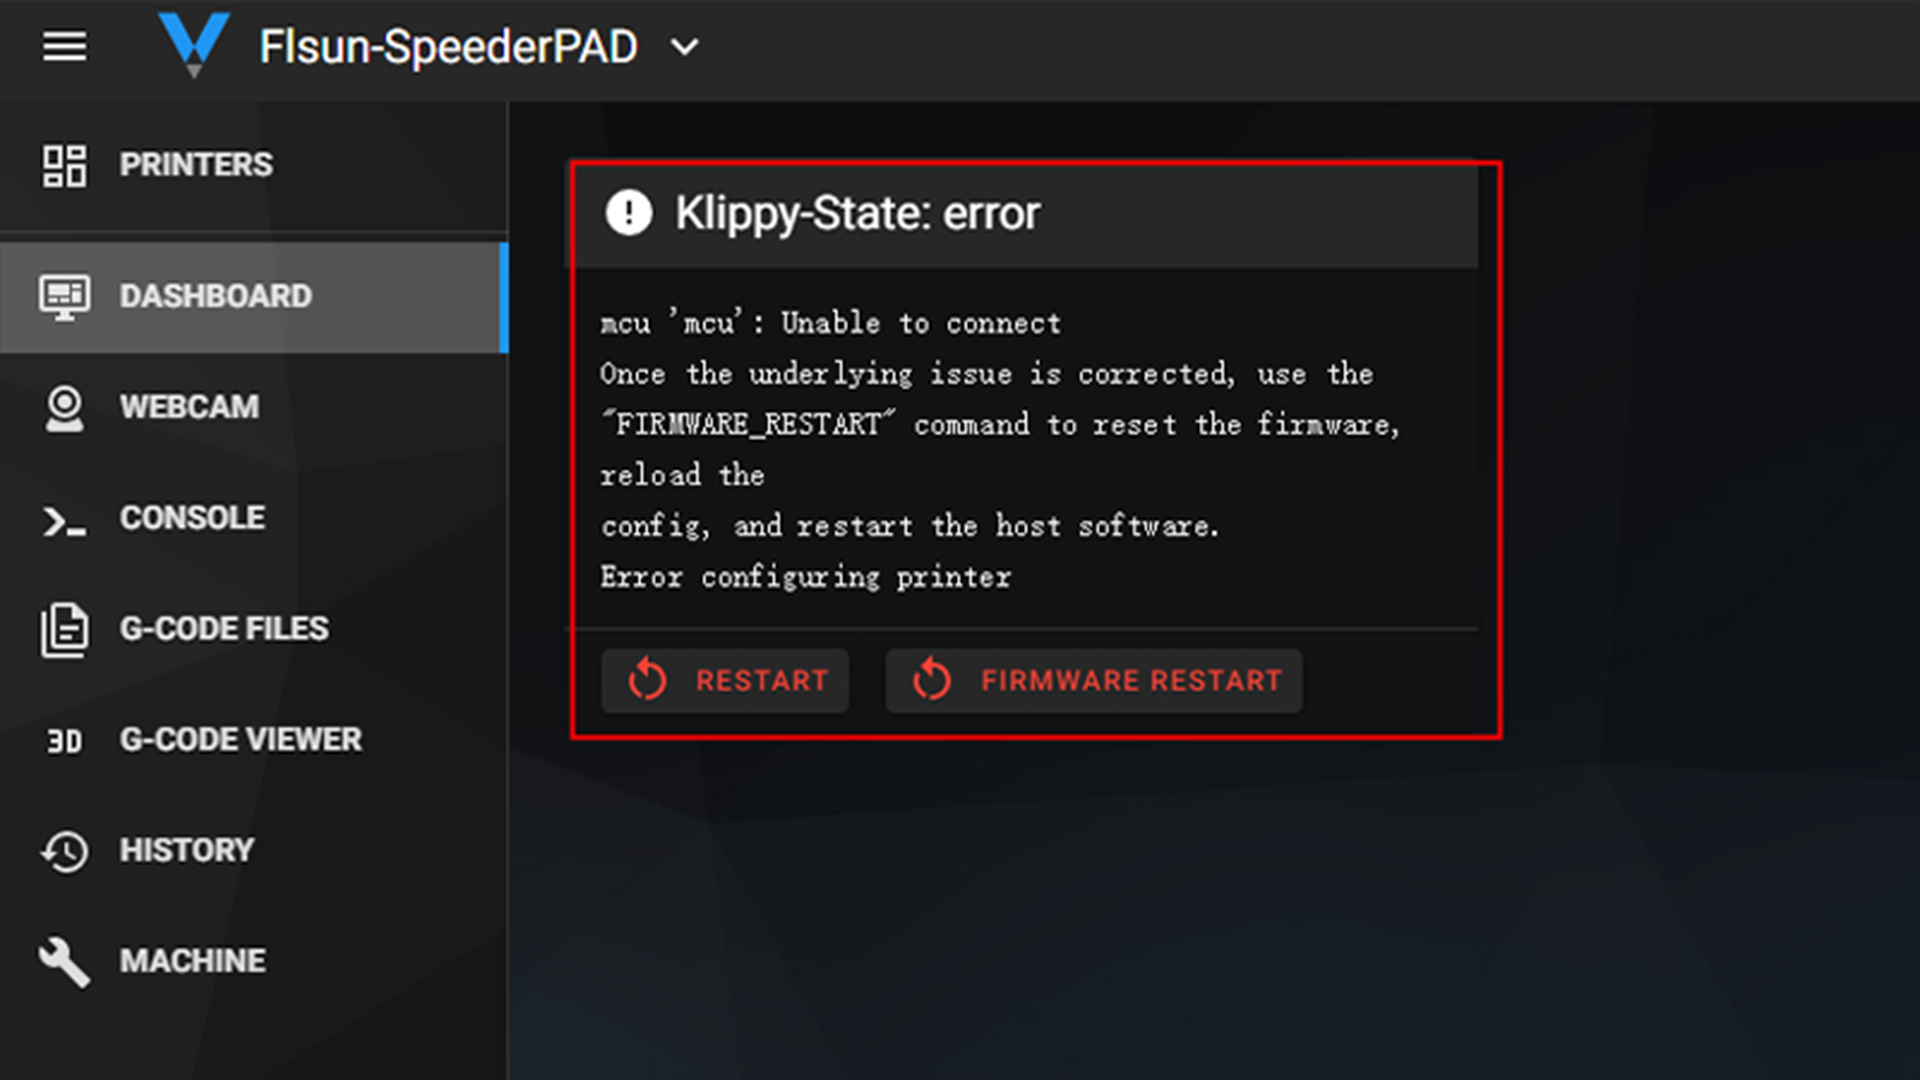
¶ Troubleshooting:
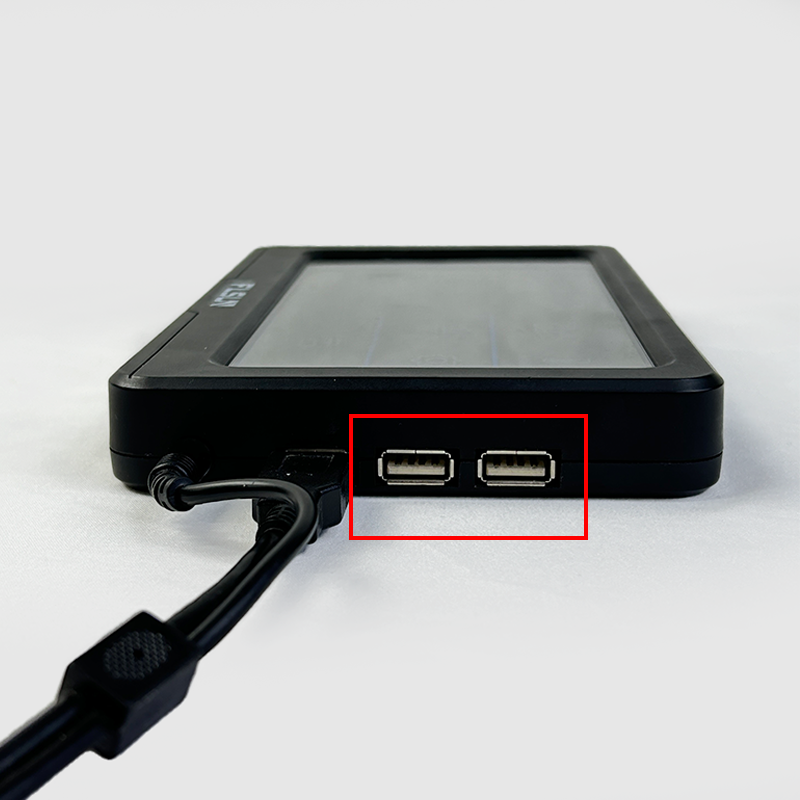
¶ (1).Swap the location of the USB port and try again
¶ (2).Replace the printer.cfg file
Reference Video:
https://www.youtube.com/watch?v=7qxyGcUkr8M
¶ (3).Flashing motherboard firmware
Link to download motherboard firmware:
https://flsun3d.com/pages/speeder-pad
Link for flashing motherboard firmware operation:
https://www.youtube.com/watch?v=8g3bSNh9KEo
¶ (4).pad image recovery
Link to download the image:
https://github.com/Flsun3d/Flsun_Speeder_Pad#update-the-firmware
Link to the operation video:
https://www.youtube.com/watch?v=LTN1t0N2T8g
¶ (5).Troubleshoot temperature sensor
If the temperature sensor is short-circuited and the motherboard and pad can not be connected, you can use the spare temperature sensor in the kit to plug it directly into the corresponding port on the adapter board/mainboard when the machine is powered off, if the connection can be restored after powering on the machine, it means that it is the temperature sensor itself, and you need to replace the temperature sensor.

¶ (6).Troubleshoot if the motherboard light will come on
¶ Open the upper case of the machine and check if the motherboard light will light up.
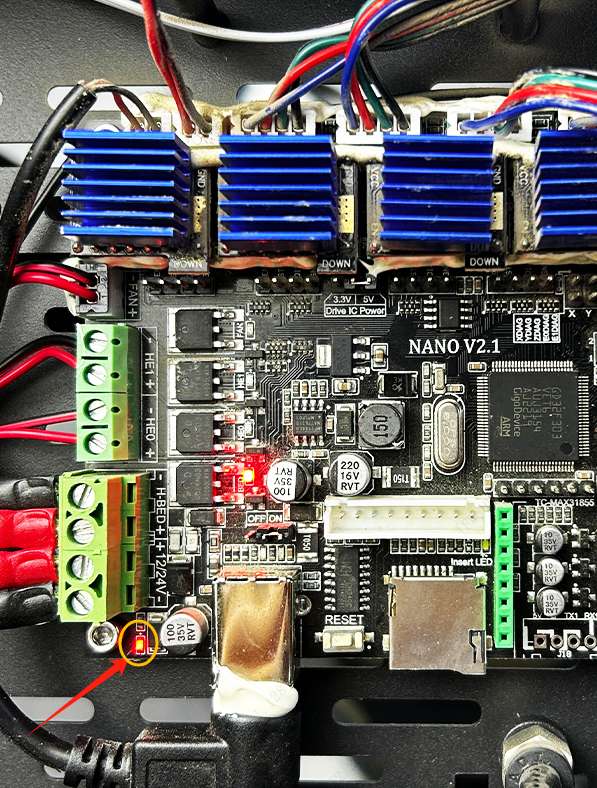
¶ If the motherboard light does not come on, unplug the wires from all the ports on the motherboard and keep only the 24V power input port. If the motherboard light is still not on at this time, it is the problem of the motherboard. Please contact the after-sales service to deal with it.
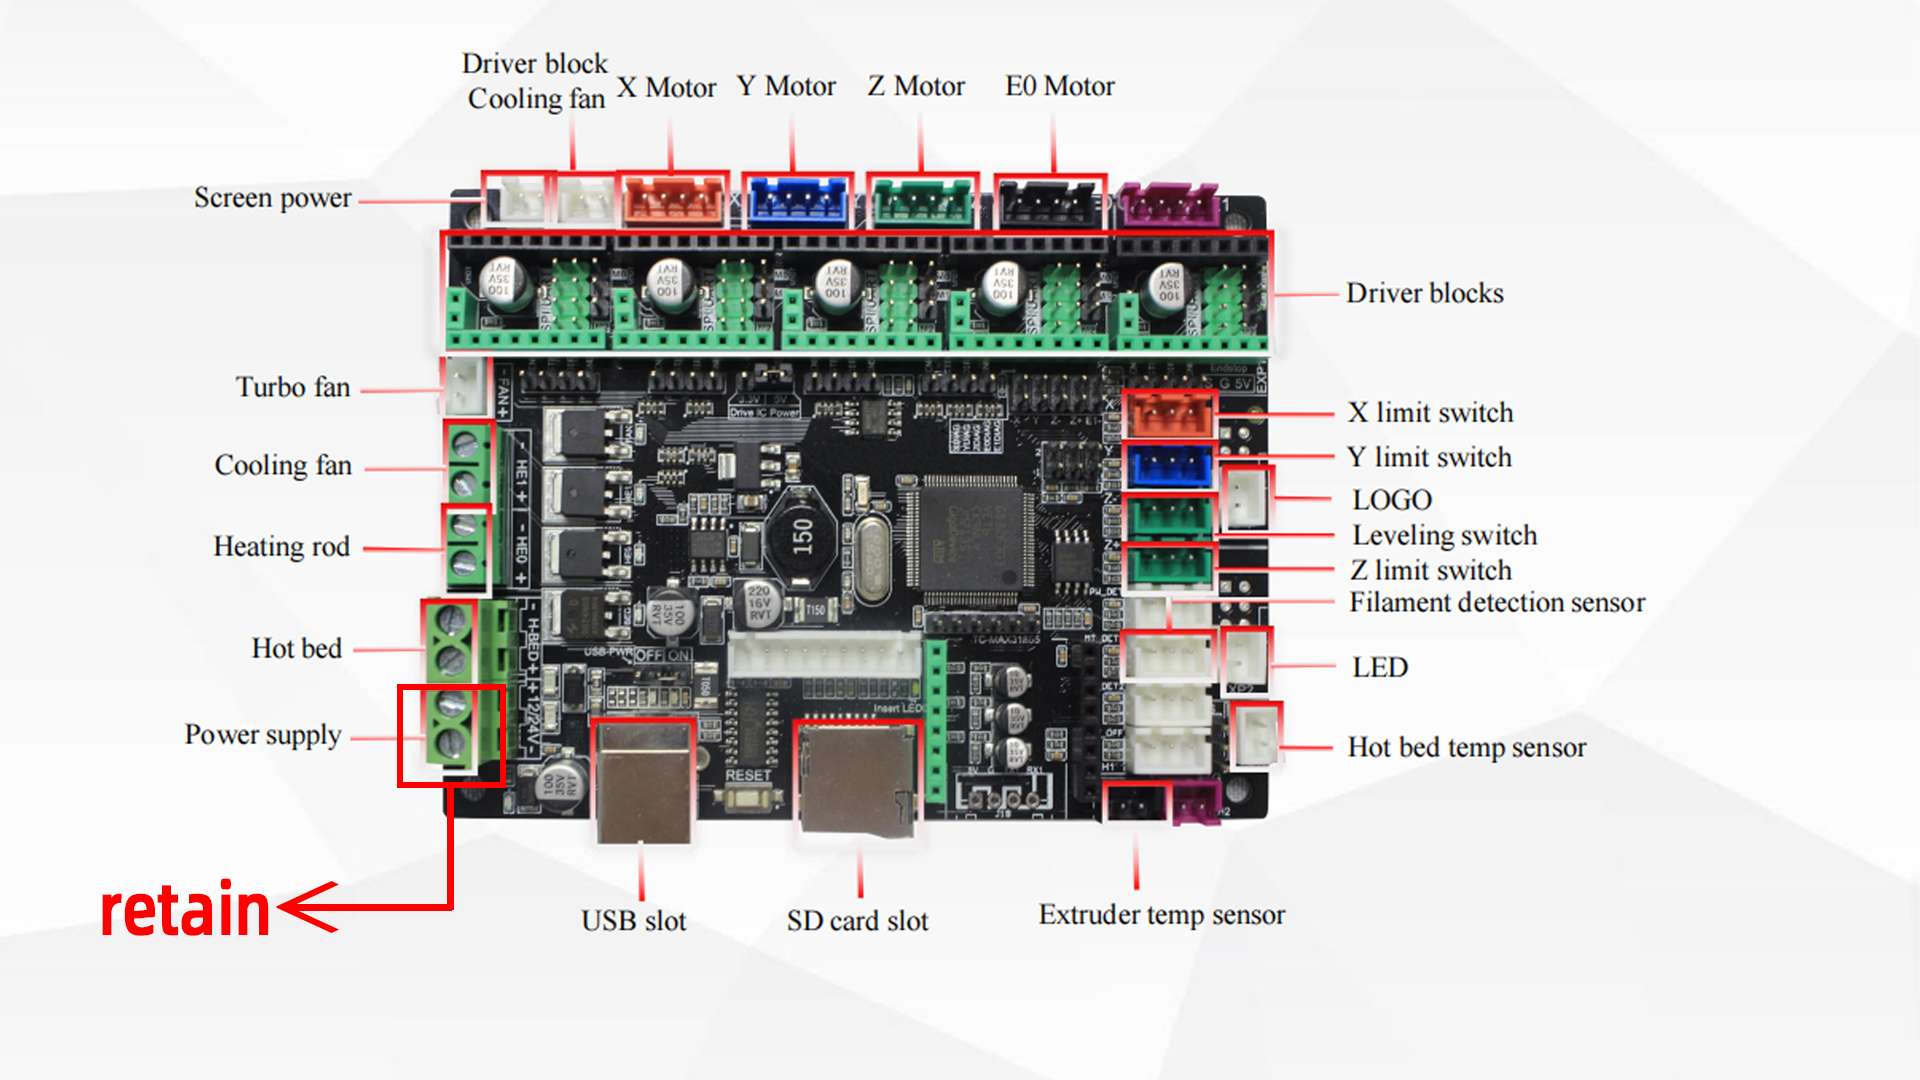
¶ If the motherboard light can light up normally, unplug the wires of all ports on the motherboard, and only keep the wires of 24V power input and nozzle, hot bed temperature sensor,USB cable and check whether there is any error report. If there is any error, please contact the after-sales service.
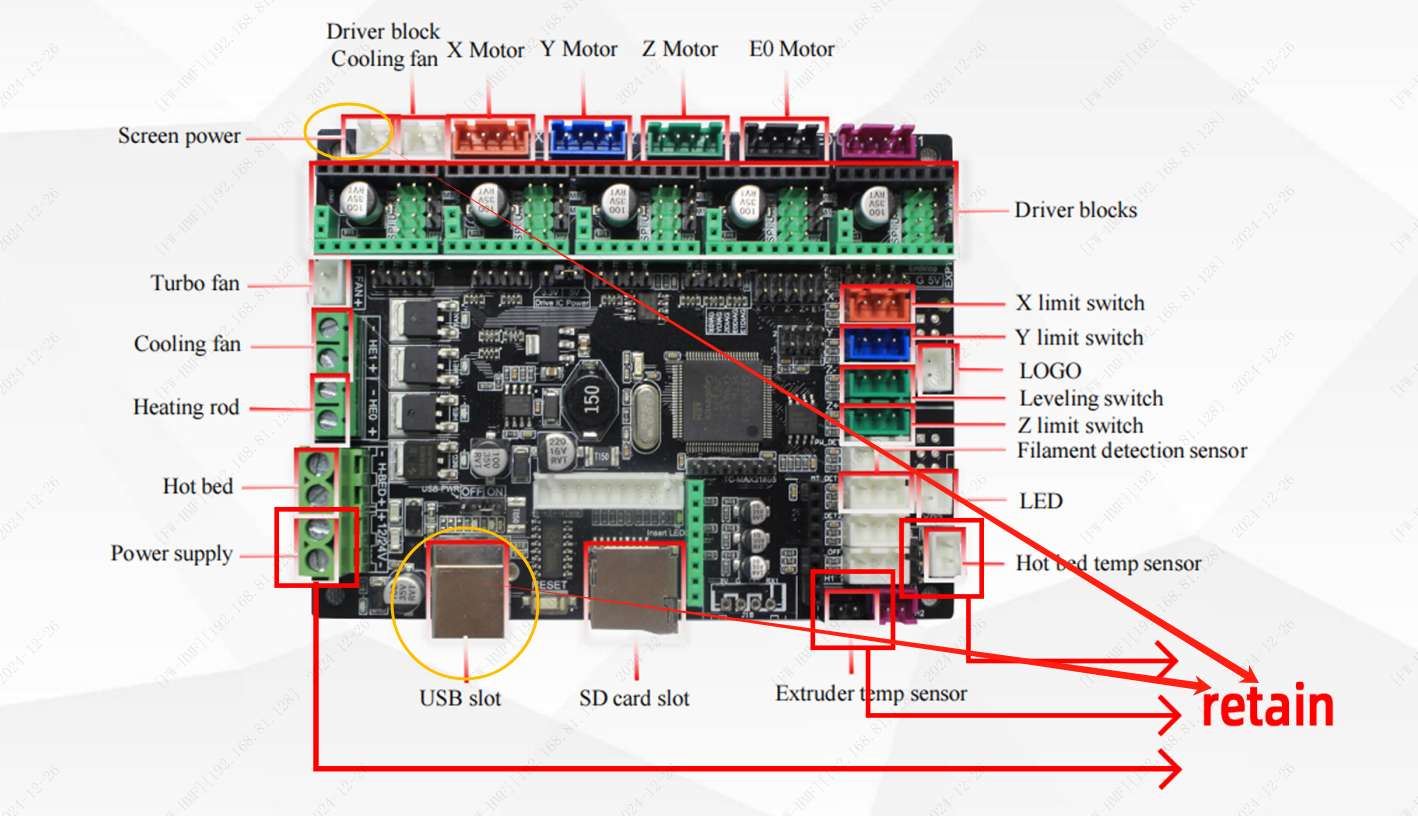
¶ Video to solve the problem that the motherboard and pad cannot be connected:
https://www.youtube.com/watch?v=3WHZmDDlPUo
¶ 2.MCU shutdown: ADC out of range
¶ Phenomenon:
¶ Troubleshooting plan:
(1). Check whether the line port corresponding to the temperature sensor on the mainboard and adapter board is loose, and re-plug to ensure there is no looseness.
(2). Lay the machine flat and check whether the 8P wire (under the Y-axis) is loose. You can re-plug and unplug the 8P wire to ensure there is no looseness.
(3). Replace the nozzle temperature sensor with a new one
Reference video:
https://www.youtube.com/watch?v=5kkpZrTR_1k&list=PLsTPSOJeRED3xrS5gFkkPuSXPB2YC0mG5&index=21
¶ 3.Heater extruder not heating at expected rate
¶ Phenomenon:
¶ Troubleshooting plan:
(1). Check whether the circuit corresponding to the hot rod is loose
¶ (2). Replace the nozzle heating rod with a new one
Reference video:
https://www.youtube.com/watch?v=5kkpZrTR_1k&list=PLsTPSOJeRED3xrS5gFkkPuSXPB2YC0mG5&index=21
¶ 4. TMC stepper b" reports error :GSTAT:00000004 uv cp=1(Undervoltage!)
¶ Phenomenon:
¶ Troubleshooting plan:
a, b, and c in the error message represent the X, Y, and Z axis drivers of the printer respectively.
If driver b reports an error at this time, you need to switch the Y-axis driver and Z-axis driver on the motherboard while the power is off to see if the error message changes. If the error message changes, it means there is a problem with the Y-axis driver and a new driver needs to be replaced. If there is no change, it means there is a problem with the motherboard and you need to replace it with a new one.
Swap driver reference video:
https://www.youtube.com/watch?v=Fx27En0GoEc
¶ 5. TMC stepper b" reports error: DRV_STATUS: 401b0103 otpw=1(OvertempWarning!) ot=1(OvertempError!)
¶ Phenomenon:
¶ Troubleshooting plan:
(1). Check the motherboard fan. If the fan does not rotate, you need to exchange the ports of the motherboard fan cable and the pad power cable. If the motherboard fan still does not rotate after turning on the computer, it means there is a problem with the motherboard fan and you need to replace it with a new one. If the motherboard fan rotates, it means there is a problem with the motherboard fan port and the motherboard needs to be replaced with a new one.
(2).a, b, and c in the error message represent the X, Y, and Z axis drivers of the printer respectively.
If driver b reports an error at this time, you need to switch the Y-axis driver and Z-axis driver on the motherboard while the power is off to see if the error message changes. If the error message changes, it means there is a problem with the Y-axis driver and a new driver needs to be replaced. If there is no change, it means there is a problem with the motherboard and you need to replace it with a new one.
Swap driver reference video:
https://www.youtube.com/watch?v=Fx27En0GoEc
¶ 6.Unable to read tmc uart “stepper b” register IFCNT
¶ Phenomenon:
¶ Troubleshooting plan:
a, b, and c in the error message represent the X, Y, and Z axis drivers of the printer respectively.
If driver b reports an error at this time, you need to switch the Y-axis driver and Z-axis driver on the motherboard while the power is off to see if the error message changes. If the error message changes, it means there is a problem with the Y-axis driver and a new driver needs to be replaced. If there is no change, it means there is a problem with the motherboard and you need to replace it with a new one.
Swap driver reference video:
https://www.youtube.com/watch?v=Fx27En0GoEc
¶ 7. Can not update MCU ‘mcu’ config as it is shutdown
(1). Click to restart the firmware or system
(2). Replace printer cfg on the web side
Reference video for replacing printer cfg on the web side:
https://www.youtube.com/watch?v=7qxyGcUkr8M&list=PLsTPSOJeRED1wsbAuwSzg4oO_6ZhNMTfK&index=3
¶ 8.Unable to open config file /home/pi/klipper_config/printer.cfg
¶ Phenomenon:
¶ Troubleshooting plan:
(1). Replace printer cfg on the web side
Reference video for replacing printer cfg on the web side:
https://www.youtube.com/watch?v=7qxyGcUkr8M
(2). Refresh the Pad image file
Reference video:
https://youtu.be/_V2xqv7EDcY
¶ 9. horizontal_move_z can’t be less than probe’s z_offset
¶ Phenomenon:
¶ Troubleshooting plan:
(1). Restart the machine.
(2). Replace printer cfg on the web side
Reference video for replacing printer cfg on the web side:
https://www.youtube.com/watch?v=7qxyGcUkr8M
¶ 10.Probe triggered prior to movement
¶ Phenomenon:
¶ Troubleshooting plan:
(1). If the leveling module probe does not touch the heating bed, check whether the probe indicator light is on and troubleshoot the leveling module problem.
(2). If the naughty module probe contacts the heating bed and no longer lifts up, replace the printer.cfg configuration file.
Reference video for replacing printer cfg on the web side:
https://www.youtube.com/watch?v=7qxyGcUkr8M
¶ 11: Lost communication with MCU ‘mcu’
¶ Phenomenon:
During leveling, once the naughty module probe comes into contact with the hot bed, the klipper will shut down and an error message will be reported. The MCU has lost contact.
¶ Troubleshooting plan:
(1). Install the leveling module to the motherboard, press the switch, and check for problems with the leveling module.
(2). If there is no abnormality in the leveling module, it means that there is a problem with the adapter board and the adapter board needs to be replaced.